All music videos have tranisitions and Final Cut allowed us to add a wide range of genre specific transitions to complement our clips and enhance our video. Adding transitions was very easy and was done by selecting the start or end of the clip. If we wanted to add a fade out we would select the end of the desired clip and if it was a fade in we selected the start. We then had to click on what transition we wanted, because our genre is Alternative Rock we used fades and cross dissolves. This is because these transitions are evident in many Alt Rock videos and are a key convention that we must follow if we want to make a realistic video.
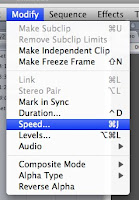
 In our video we decided that some footage would look more effective if it was slower, some of the clips were over before our target audience would have been able to see the footage and take the connotations. Matt decided to slow down some of the footage so people could appreciate it more, he did this by selecting the clip that needed to be edited then going to the tab Modify and selecting Speed. This then pops up a sub menu which allows you to alter the percentage of the speed. Because we were looking for a slower effect we had to decrease this percentage, we were then able to watch the clip in viewer and make ammendmants if needed.
  We were able to lock clips on the timeline so that they remained in place, especially after Matt had made sure the lip sync was tight. On some occasions we found that when footage was dragged on to the timeline it moved footage that was in the way knocking it out of the specific position it had been put in. Locking the clips meant that this stopped happening we were also able to lock the track so that did not fall out of allingment with the clips. If we need to unlock tracks we were able to do this easily and the re lock the footage once we had edited it. This was done by clicking on the pad lock.(right)
No comments:
Post a Comment